

DISCLAIMER: This article was migrated from the legacy personal technical blog originally hosted here, and thus may contain formatting and content differences compared to the original post. Additionally, it likely contains technical inaccuracies, opinions that the author may no longer align with, and most certainly poor use of English. This article remains public for those who may find it useful despite its flaws.
Since the appearance of Shader Model 4.0 people wonder how to take advantage of the newly introduced programmable pipeline stage. The most important feature enabled by geometry shaders is that one can change the amount of emitted primitives inside the pipeline. The first thing that a naive developer would try to do with it is geometry tesselation. However, the new shader performs very bad when used for tesselation in a real life scenario even though there are demos show casting this possibility. If we take a closer look at the new feature we observe that the most revolutionary in it is not that it can raise the number of emitted primitives but that it can discard them. This article would like to present a rendering technique that takes advantage of this aspect of geometry shaders to enable the GPU accelerated culling of higher order primitives.
Geometry shaders can be used for many different advanced rendering techniques that were impossible before the introduction of this flexible programmable shader stage. In this article I would like to present one use case that for me seemed to be one of the most practical application of primitive manipulation possibilities introduced by geometry shaders. As I haven’t seen any whitepaper talking specifically about this particular technique, even if some of them inherently used it, I would dare name the technique myself as Instance Cloud Reduction. I will also present a demo program that shows how to take advantage of the technique in a heavy workload situation.
The idea itself was inspired by AMD’s tech demo for the Radeon 4800 series cards called March of the Froblins. An almost identical technique presented in this article is used in the mentioned demo for the culling of large amount of animated creatures against the view frustum. Also a somewhat similar technique is used in NVIDIA’s Skinned Instancing demo for determining LOD instance sets. Unfortunately, both demos are for DirectX only and, as far as I can tell, there is no OpenGL demo showing any of the aforementioned rendering techniques.
Motivation
Nowadays, as the computational capabilities of GPUs is growing in a much faster pace than that of CPUs, graphics developers meet more and more optimization problems related to CPU bound applications. More and more focus is on minimizing the number of driver invocations, actually that’s what motivated the restructuring of the two most commonly used graphics APIs. As a result we have now DirectX 10+ and OpenGL 3+. However, even if the introduction of geometry instancing, texture arrays and local memory buffer storage for the most important inputs of the rendering, there is still need for wise decisions from graphics programmers to take full advantage of the horsepower coming with the latest GPUs.
Earlier graphics applications strongly relied on CPU based culling techniques, whether it be the usage of the quite outdated BSPs or the more generic and still heavily applied hierarchical culling techniques. We’ve already reached the point that sometimes even the most efficient CPU based culling techniques seem to be too expensive and usually introduce the small batch problem. Instanced rendering is not an exception.
The applicability of geometry instancing is strongly limited by several factors. One of the most important ones is the culling of instanced geometries. One may choose to cull these objects in the same fashion as others, using the CPU, but that usually breaks the batch and maybe we loose the benefits of geometry instancing. It is more and more imminent to have a GPU based alternative. Without CPU based culling, by sending the whole bunch of instances down the graphics pipeline may choke our vertex processor in case we have high poly geometries and quite large amount of instances of it.
The rendering technique presented in this article will try to achieve this goal. We will use a multi-pass technique that in the first pass culls the object instances against the view frustum using the GPU and in the second pass renders only those instances that are likely to be visible in the final scene. This way we can severely reduce the amount of vertex data sent through the graphics pipeline.
Implementation
For some people it might seem that the promise for such a technique is simply too naive and is most probably relying on very exotic OpenGL features, heavy misuse of some basic features or need of data conversions during the frame rendering. Wondrously, this is not the case as we have all we need in OpenGL 3.2 to implement the object culling method sketched above. All we need are the followings:
- instanced rendering (core since OpenGL 3.1)
- geometry shaders (core since OpenGL 3.2)
- transform feedback (core since OpenGL 3.0)
- uniform or texture buffers (core since OpenGL 3.1)
The method itself is a multi-pass rendering technique, however, unlike other multi-pass rendering techniques it does not produce any fragments in the first pass, instead the first pass does the view frustum culling and processes data entirely only inside buffer objects.
Culling pass
In the first pass we will feed the graphics pipeline with information about the instances that are needed to perform the view frustum culling. For this we need two inputs for the executed shaders in order to be able to perform the required calculations:
- Instance transformation data (whether it be a simple transformation matrix or quaternions or whatever) – This preferably comes from one or more buffer objects that are bound as vertex buffers to the context.
- Object extents information – Beside the instance positions we have to know the extents of an instance in order to perform correct culling. This can be either a single float representing the object radius if we choose to use bounding spheres for the culling or a three-dimensional extent vector if we would like to use bounding boxes.
Using these as input we can feed in the instance transformation data as attributes of point primitives to our culling shader. The culling shader is composed of a vertex and a geometry shader. In a typical setup the role of each is the following: the vertex shader determines whether the actual object instance’s bounding volume is inside the view frustum and sends a flag about the culling to the geometry shader, that will emit the instance data to the destination buffer if the flag says that the instance is likely to be visible or does not emit anything if it is determined that the object instance is out of view.
Next, transform feedback is used to capture the primitives emitted by the geometry shader into another buffer object that will be used in the actual rendering pass to source instance transformation data. Beside this, we also need to have an asynchronous query to determine the number of primitives generated to know how many instances of the object do we actually need to render. The following figure shows the workflow of the first pass:

The actual geometry shader implementation needed to perform the actual culling based on the view frustum check performed by the vertex shader should look like the following chunk:
#version 150 core

layout(points) in;
layout(points, max_vertices = 1) out;

in vec4 OrigPosition[1];
flat in int objectVisible[1];

out vec4 CulledPosition;

void main() {

    /* only emit primitive if the object is visible */
    if ( objectVisible[0] == 1 )
    {
        CulledPosition = OrigPosition[0];
        EmitVertex();
        EndPrimitive();
    }
}
In this example we used only simply a four-component position vector for the instance transformation data but the technique works well for transformation matrices and quaternions as well.
One more thing is that beside that we set up transform feedback in a way that we feed our buffer object dedicated for the culled instance data and we also started an asynchronous query to be able to determine the number of primitives written into the buffer object, it is also useful to turn of rasterization as we wouldn’t like to produce any fragments as a result of the first pass.
Rendering pass
In the second pass there is nothing special to do. Simply use whatever rendering setup you would like to use. The only things that need to be changed in this step compared to your already existing rendering path is that the instance data for the rendering must be sourced from the generated culled instance data buffer and, as a result, the number of instances passed for the instanced drawing functions shall be changed in order to render only the visible instances. This number can be read from the asynchronous query’s result that we started in the first pass.
The instance data in the rendering pass can be, of course, sourced from either a uniform or a texture buffer object. This depends on the actual use case and is more clearly explained in the article Uniform Buffers VS Texture Buffers.
Important note is that when one has to deal with several instanced geometries it is recommended to do the culling phase prior to rendering any instanced primitives because of the following reasons:
- The result of the first instance cloud’s culling is more likely to be finished on the GPU so no sync issues arise from reading the asynchronous query result to determine the number of visible instances.
- Probably less state changes are needed as very different setup is required by the two passes.
- Results in tidier renderer design as culling is clearly separated from actual rendering.
Putting everything together, the application of the presented technique would result in the following workflow on the GPU:

Conclusion
We’ve seen that the presented advanced rendering technique is able to help in situations when we have to deal with large number of instanced geometries and how to take advantage of the latest features of graphics cards and OpenGL to perform view frustum culling calculations on the GPU. This prevents us from having to deal with complicated and expensive CPU based object culling methods that break the drawing batches, especially when dealing with dynamic objects. For ease the decision whether to incorporate this technique in your rendering engine I would like to present the advantages and disadvantages of it.
Advantages:
- Heavily reduces the amount of processed data in a naive implementation.
- No need for any space partitioning methods in the host application to handle the culling of dynamic objects.
- Can handle huge amount of instanced objects due to the enormous horsepower of today’s GPUs.
- Scales well with increased number of instances as the per-instance calculation is relatively low.
- Relies strictly on OpenGL 3.2 core features.
- No need for OpenCL capable hardware.
Disadvantages:
- Needs an extra rendering pass to perform the culling.
- Requires the usage of asynchronous queries to determine the number of visible instances.
I hope you agree with me and think about this technique as one more step towards fully GPU based scene management. If you have any remarks or improvement ideas regarding to the rendering technique itself feel free to tell me.
The Demo
As I promised, the technique presented above comes with a live demo that actually took most of my time dedicated to writing this blog in the last two weeks. The demo itself is more like a technical show cast rather than a presentation of a real-life use case scenario.
First of all, I used high polygon count models for the rendering to emphasize the amount of time the culling phase spares from the very valuable time of our GPU. In a real world application one would never do something like this. As a result, the demo is more like a benchmark than an interactive application. However, maybe on high-end graphics cards it can perform pretty well.
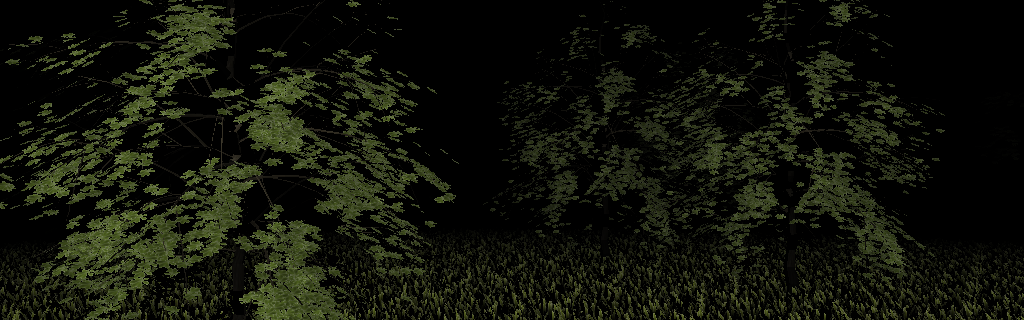
The demo scene consists of two object types: trees and grass blocks. The tree model is further divided into two parts as they need different textures: the tree trunk and the tree foliage. Obviously, this additional burden can be prevented by using texture arrays to avoid the need of separate draw calls to render the trunk and the foliage.
The tree trunk consists of 33138 triangles, the tree foliage has 16069 triangles and the faking-free grass block consists of 8961 triangles which I had to model myself as didn’t found any suitable model. Actually this modeling step consumed quite a reasonable amount of my time spent with the demo as I’m not an expert in this domain.As you can see, these models are not the ones that one might use in an interactive real-time application like games. However, they seemed to be very suitable for the purpose of the demonstration.
What really kicks off the boundaries of GPUs is that the demo renders 10,000 trees and 250,000 grass blocks using instancing. This ends up in more than 2.7 billion triangles in the scene. This is far more that a GPU can handle without the aid of some scene management and culling. However, we will use no scene management at all and the only culling method that we will use is the one presented in this article.
The actual results are quite promising. The view frustum culling step usually spares more than 99.9% of the GPU horsepower as the amount of actually rendered triangles after the culling step is far below 2 million triangles. This is still quite much but as we use high polygon count models and we don’t use any LOD techniques this seems reasonable.
Even if the demo scene statistics doesn’t seem like a typical use case scenario, the ease of the implementation and the compelling visual results made me pleased anyway:
On my Radeon HD2600XT I have achieved 6-7 frames per second which is acceptable taking in consideration the huge amount of geometry data still passed to the graphics card. On more recent cards I suppose it should run with good frame rates, however, due to the lack of hardware to test on, these are my only results. If anybody manages to take a better screen capture than mine above then please let me know.
Implementation details
Just to tell a few words about what techniques and tricks I’ve used during the creation of the demo here is a listing of the most important ones:
- Three models are used as mentioned previously with high instance counts with over 2.7 billion of total triangles in the scene as mentioned already.
- Three 512×512 RGBA textures are used for the models that are partially handmade, and again, I’m not a texture artist so sorry if they don’t look flawless.
- The wavefront model and TGA image loader that accompany the demo are very roughly implemented only for the demo so I would strongly encourage you not to use it to any purpose as it handles only a subset of the possibilities of the file formats.
- The vertex data from the wavefront model files is transferred in a very naive way so vertex reuse isn’t taken into account.
- The instance data consists of simple four-component vectors representing the world-space position of the instance. This seemed to be the most simple for the demonstration purposes.
- In the second pass, the instance data is sourced from a texture buffer but not really because the visible instance count exceeded the amount that would fit in a uniform buffer. I used texture buffers because for this simple demonstration they seemed to be a little bit more easy to be integrated.
- The morphing effect that simulated wind blow is done using hard-coded geometry deformation in the vertex shader. It is not physically correct but visually compelling.
- The lighting is a simple directional light using Phong’s shading and reflection model.
- Simple fog is simulated with some awkward formula that I’ve chosen after a few test runs.
- Alpha testing is achieved by using the discard operation in the fragment shader.
Driver issues
During the development of the demonstration program I’ve met several driver related problems as I’ve never used so heavily the latest OpenGL features previously. I’ve worked with Catalyst 9.12 and 10.1 but both seemed to lack of a proper GLSL compiler. Here are some of the issues I’ve met:
- When I’ve forgot to declare the varyings in the geometry shader as arrays like the standard requires then still the driver hasn’t complained about any syntax error but when tried to execute the code the program crashed.
- Except the texture sampler uniform, all other uniforms failed to work when used in the fragment shader only so I’ve put them all in the vertex shader.
- For loops seemed not to work when used inside the geometry shader, that’s why the culling itself is done in the vertex shader in the demo.
All these problems resulted in nasty tricks to make things working and ended up in awful shader code. Sorry for that. At least now it works on my configuration but pretty unsure whether it will work on other graphics card and driver combos. Please report me any success or failure when trying out the demo. Anyway, be sure to have the latest graphics drivers installed as, at least in case of AMD, OpenGL 3.2 drivers came out only at the fall of 2009.
Edit:
Thanks to the information got from Pierre Boudier from AMD I’ve updated both the source and binary releases to support the latest drivers properly. The problem was that I didn’t use attribute location binding as specified in the standard.
Also have to mention that with my new Radeon HD5770 I managed to achieve over 90 frames per second that actually show that this technique can be in fact used for games and other interactive applications.
One more thing in the end. As you know this version of the Nature demo uses a texture buffer to source instance positions. I plan to create another version that will take advantage of the instanced arrays introduced in core with OpenGL 3.4. I expect quite a reasonable speedup as that would eliminate the need for texture fetches in the vertex array by rather dedicating a vertex fetcher for the purpose thus increasing the overall performance of the technique.
Links: source code, Win32 binary